Create an extension#
Lens premium subscription feature. See details on Lens Pricing.
Create a Lens extension without writing code. Lens scaffolds the project, installs it, and opens it in your AI coding tool. You describe what the extension should do in natural language, as you would explain it to a colleague, and the tool builds it.
Prerequisites#
- Lens K8S IDE installed
- An AI coding tool selected in the AI tool menu in the top bar, or under Preferences > External Tools > AI tool. It is the same selection Ask AI uses, for example Claude Code
- Node.js and npm installed. The AI tool uses them to build the extension
Step 1: Create the extension#
Start a new extension from either of two places. Both open the same dialog:
- In the AI Tools menu in the top right corner of the window, click Create extension. Its tooltip reads "Scaffold a new extension for AI-assisted development".
- In the Navigator, under Extensions, click Create new.
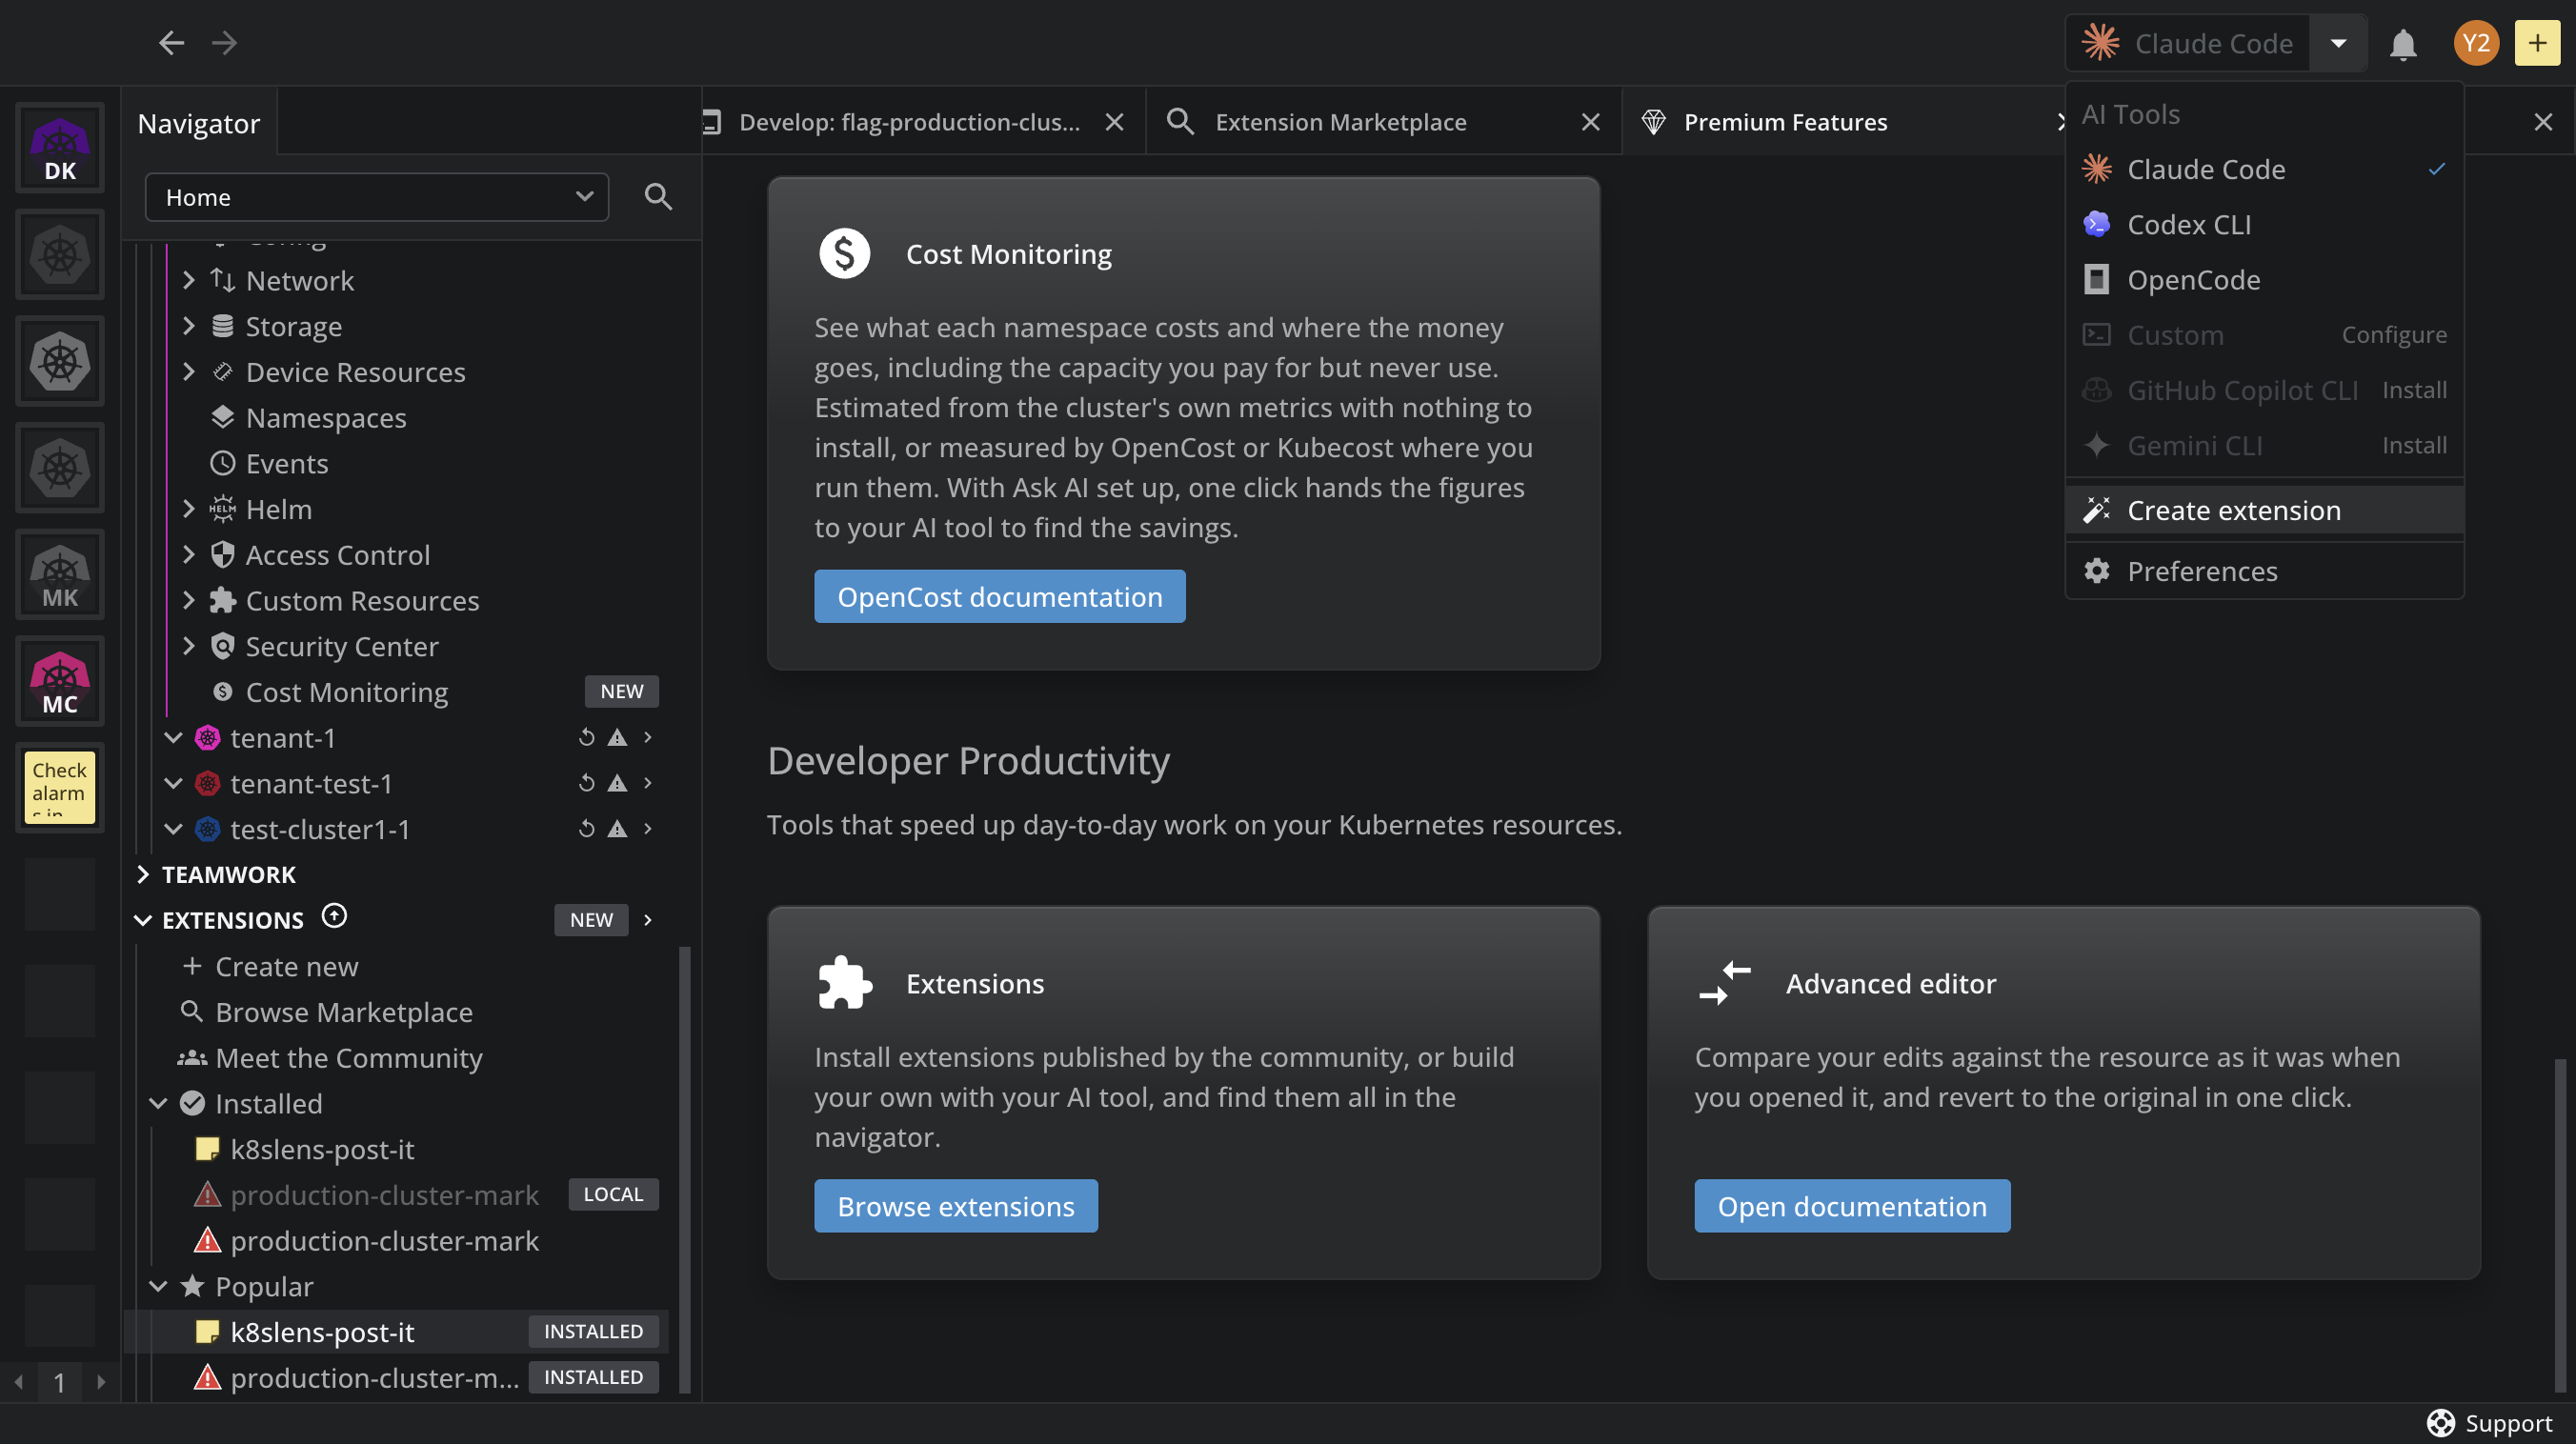
To start from a published extension instead of a blank project, see Clone an extension.
Step 2: Select name and AI tool#
To set up the extension:
- Enter a name, for example
my-extension. - Under AI Tool for extension development, select the tool to develop it with. The dialog marks the tools it detects on your system as Installed, and offers Install instructions for the others. Select No AI tool to develop the extension yourself.
- Click Create.
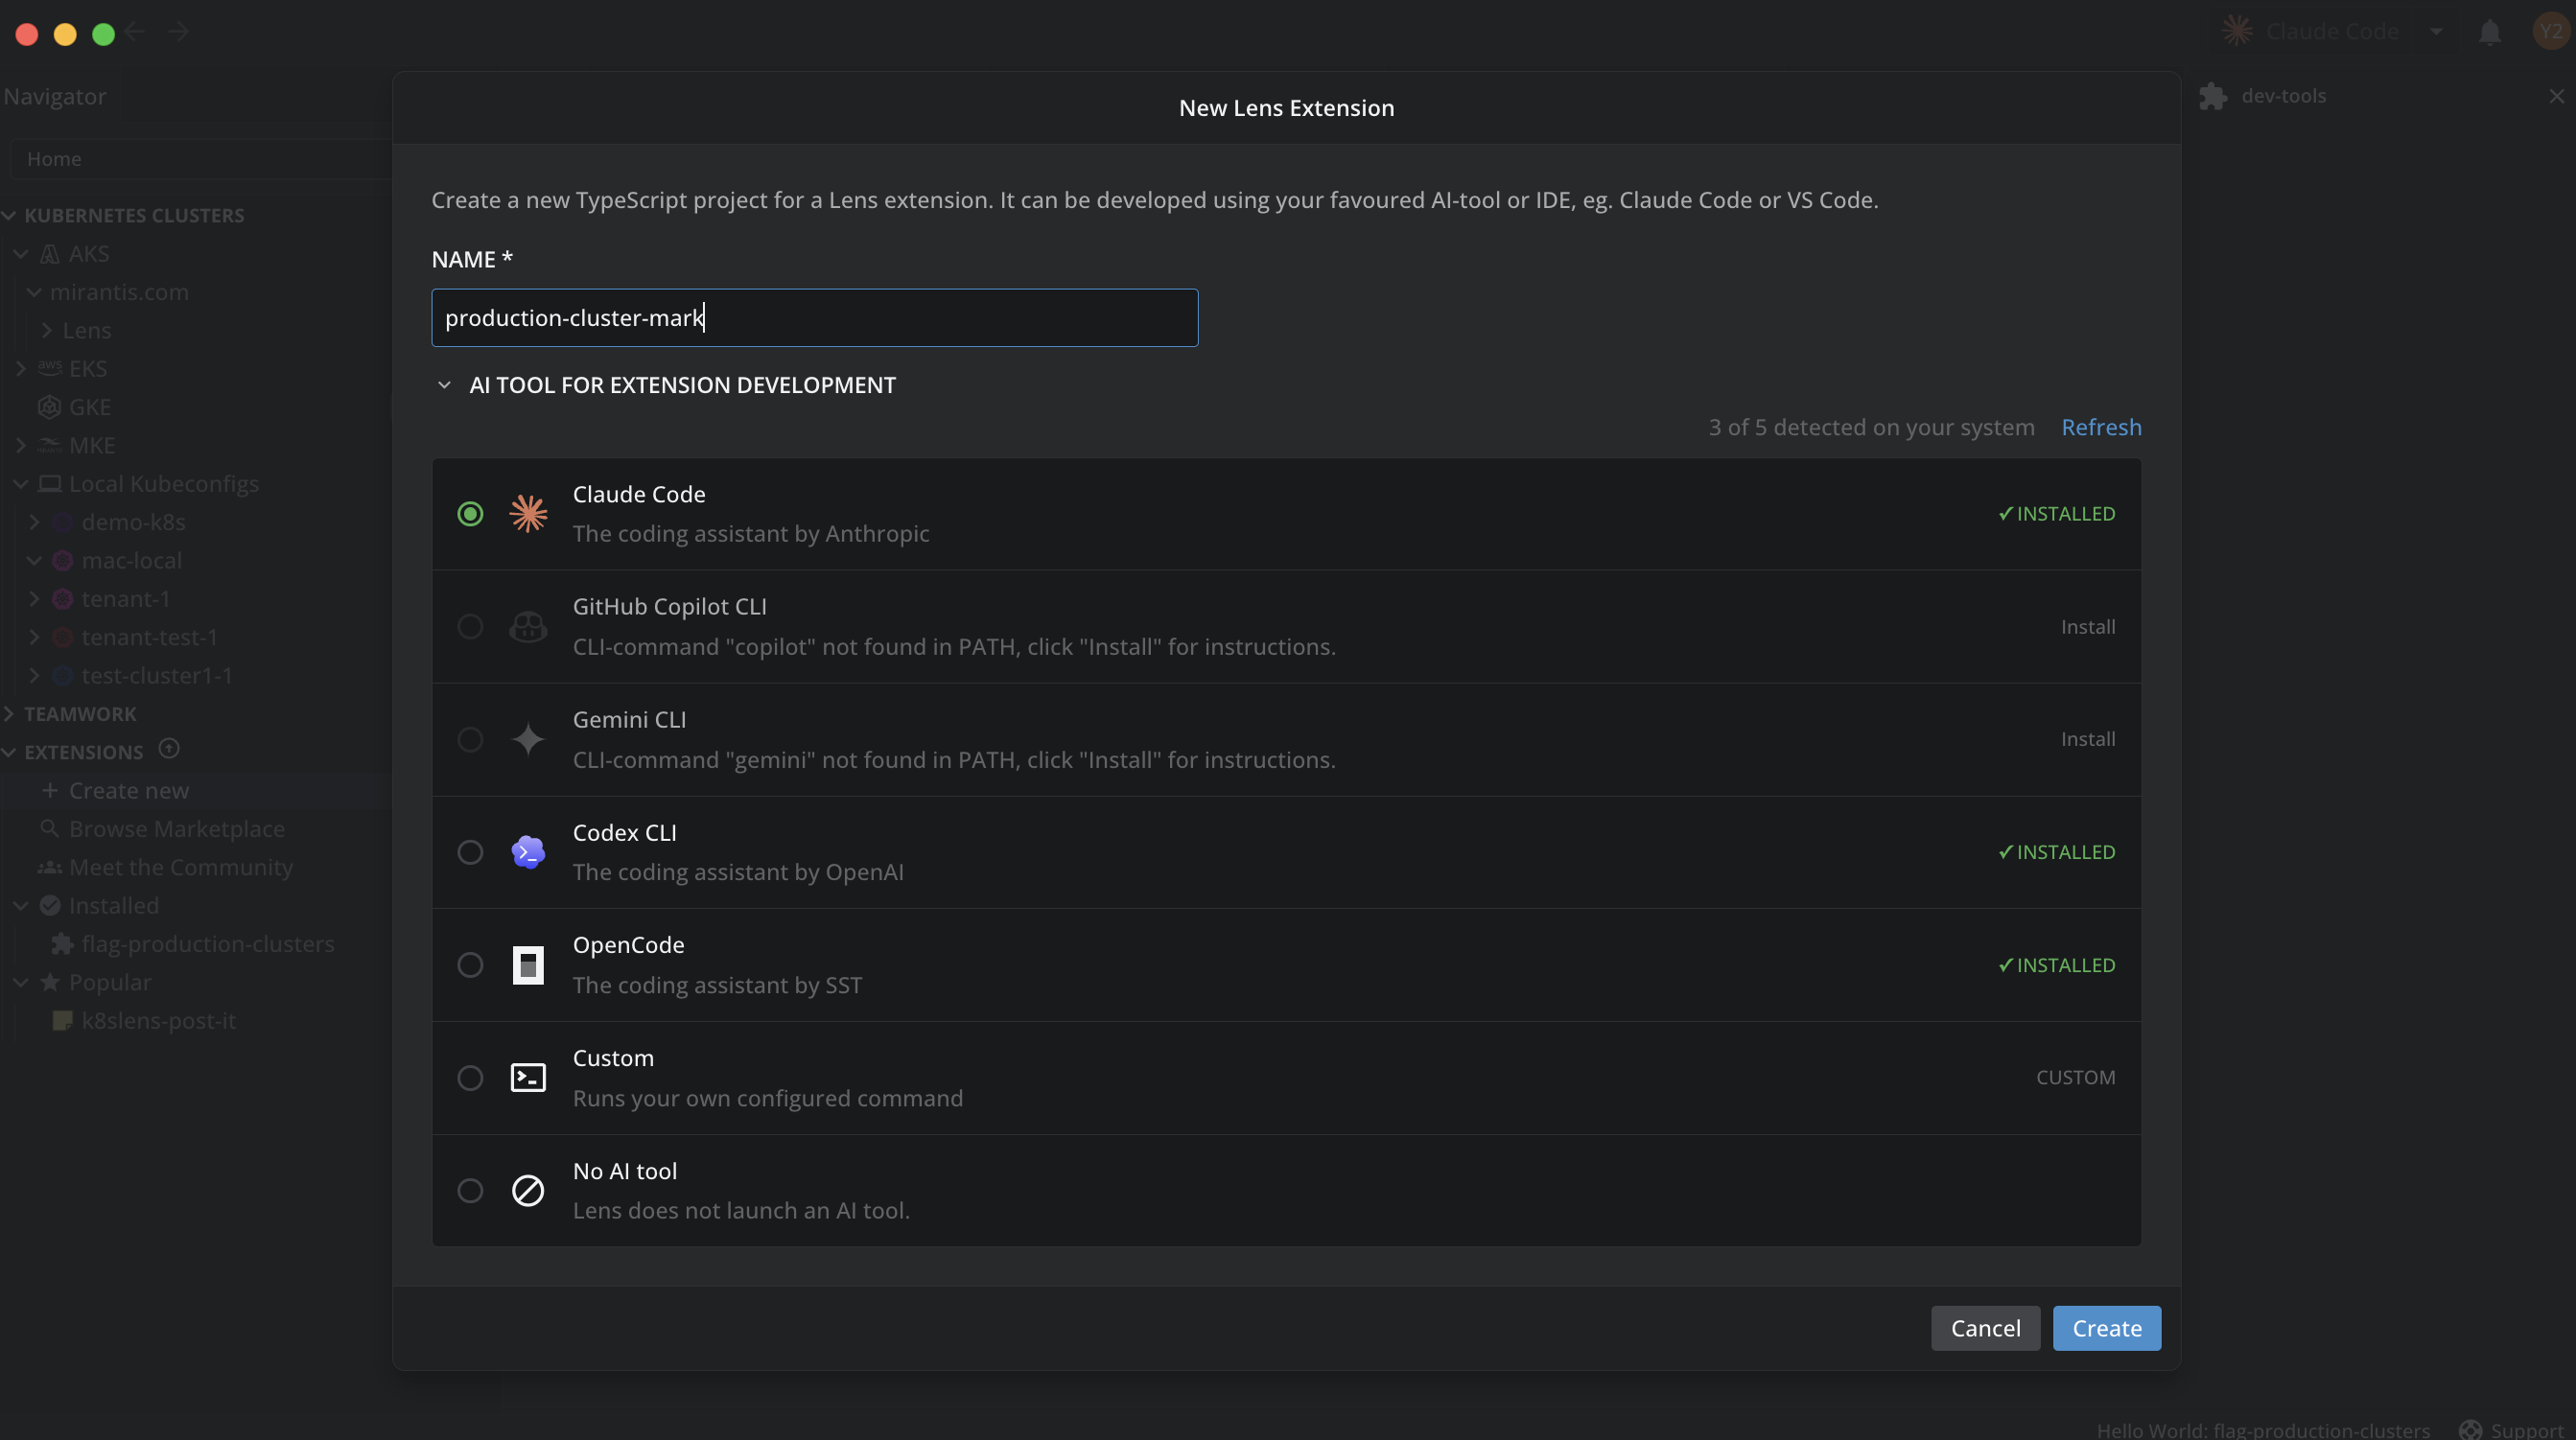
Lens scaffolds a starter TypeScript project in a folder of that name under ~/.k8slens/extensions/, and a notification confirms it: "Extension scaffolded at" followed by the folder. Lens installs the extension right away, and opens a tab named Edit: followed by the folder name, with your AI tool running in it. The starter extension is already live: a "Hello World" text appears in the status bar at the bottom of the window.
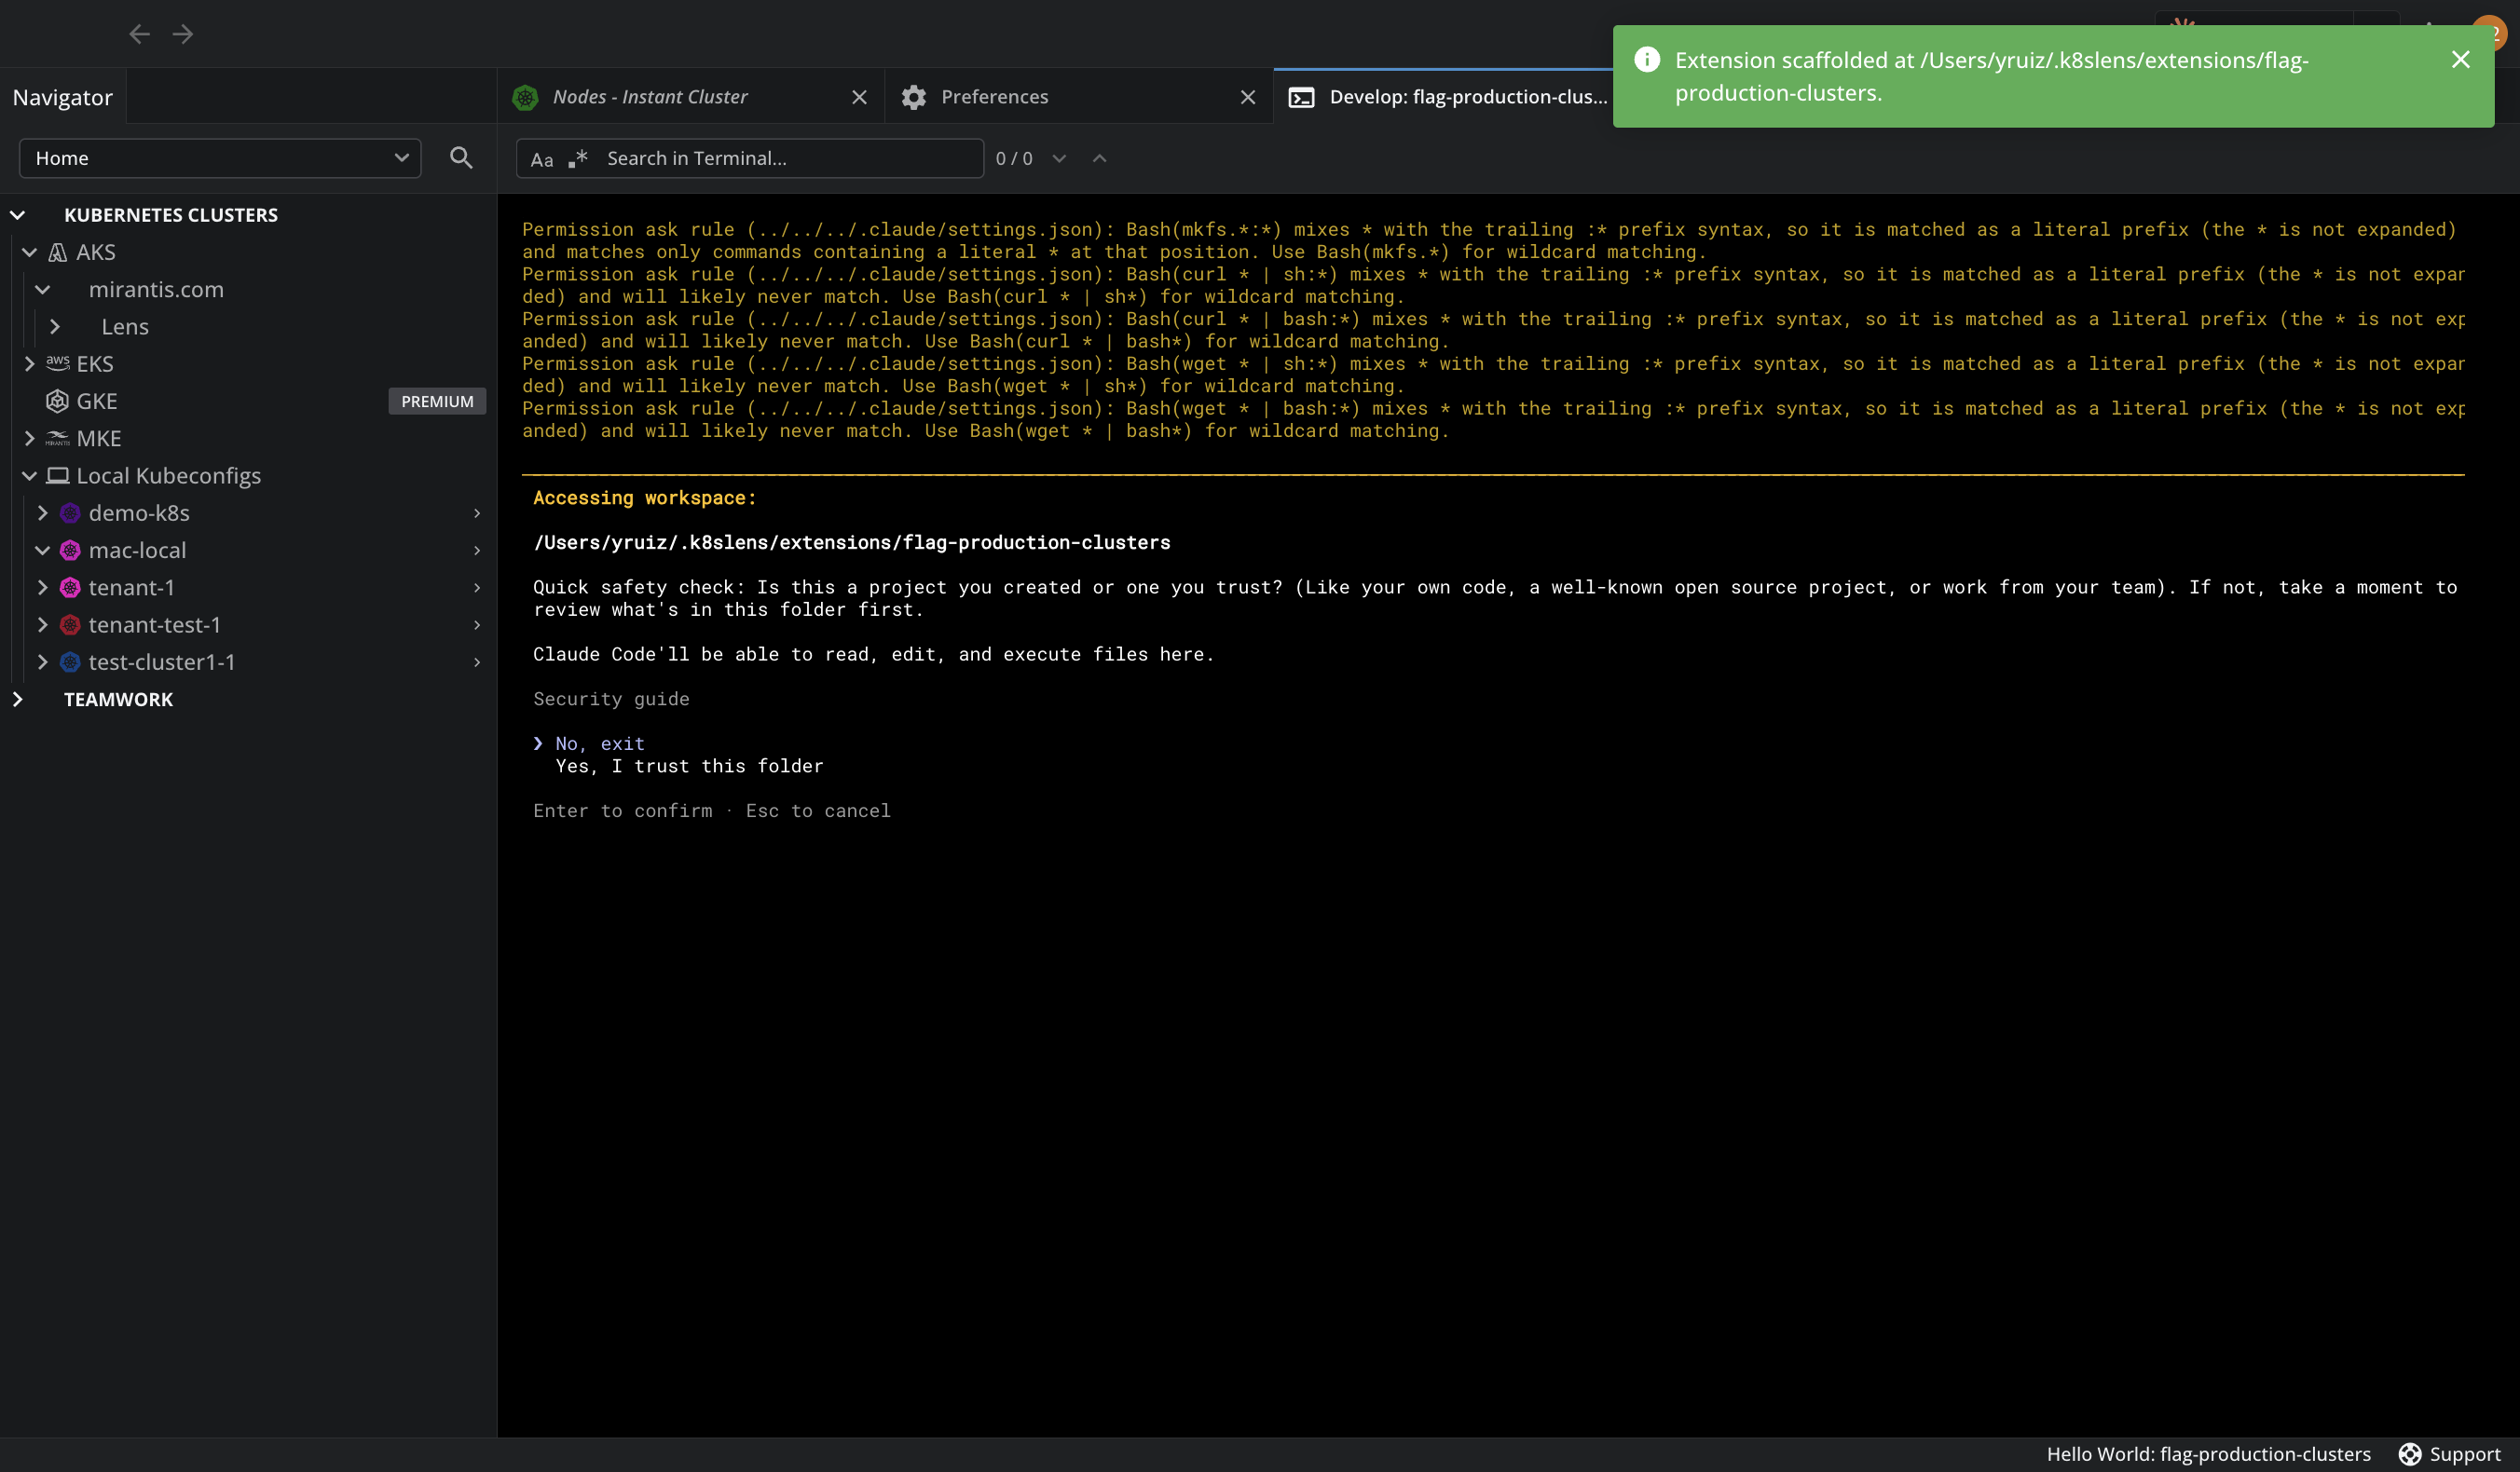
The extension name identifies the extension everywhere and is unique to it. It is the name of the extension folder, the folder your AI tool opens in, and it follows "Hello World:" in the status bar. When you work on more than one extension, the name in the Edit tab tells you which one the AI tool is changing.

Step 3: Describe what the extension should do#
Write what you want in the Edit tab, in your own words. The AI tool works from the project's own AGENTS.md and from the capability reference Lens writes to ~/.k8slens/extensions/extension-development-instructions/. That reference is regenerated on every launch, so it always matches your installed version. The tool writes the code, runs the build, and tells you when it is done.
For a complete worked example, see Create an extension to highlight production clusters.
Tip
The extension comes with skills for your AI tool. In Claude Code, run them in the Edit tab:
/lens-extension-development-ideas: starter prompts, when you are out of ideas./lens-extension-development-sync-dependencies: realign the dependency versions after a Lens upgrade./lens-extension-development-missing-capability: report to the Lens team something an extension needs and Lens does not offer./lens-extension-development-publish: check the extension is ready and publish it. See Publish an extension.
Step 4: Try it and iterate#
To try each change:
- Wait for the AI tool to finish the build. Lens picks up the rebuilt
dist/index.json its own and loads the new version, with no reload. - Try the new behavior in Lens.
- Keep iterating in the same Edit tab: describe the next change and let the tool rebuild.
What the scaffold contains#
The scaffolded project in ~/.k8slens/extensions/<NAME>/ holds:
| Path | Contents |
|---|---|
package.json |
Name, version, main pointing at dist/index.js, the lens-extension keyword, the build script, and the Lens packages the extension uses. |
src/index.ts |
The entry point, which exports the extension's Feature. |
src/placeholder.injectable.tsx |
The "Hello World" status bar item, as an example to replace. |
dist/index.js |
A prebuilt placeholder, so the extension runs before the first build. |
README.md, CHANGELOG.md |
The description npm and the marketplace show, and the change history users see on updates. |
assets/icon.svg, assets/banner.svg |
The icon and banner the marketplace shows. Replace them with your own. |
AGENTS.md, CLAUDE.md, GEMINI.md |
The instructions your AI tool reads when it opens the folder. |
.claude/ |
The skills for Claude Code. |
tsconfig.json, .gitignore |
TypeScript settings, and the files Git ignores. |
Build rules#
If you build the extension yourself, with No AI tool, follow the rules the AI tool follows. The full reference is ~/.k8slens/extensions/extension-development-instructions/README.md.
- Build a single CommonJS file at
dist/index.js, with no code splitting, no separate chunks, and no dynamicimport(). The scaffoldednpm run builddoes this. - Do not require Node built-ins such as
fs,path, oros. They are not available to extensions. - Keep each feature's
idstable. Lens scopes the extension's saved state to it. - Declare
^<VERSION>for each Lens package you use, with the versions in the reference. See Compatibility matrix.
Continue editing an extension#
If you closed the Edit tab or restarted Lens, reopen a local extension to keep working on it. To reopen it:
- Open Extensions > Installed in the Navigator.
-
Hover the extension and click Edit on its card. You can also right-click it, or click its ... menu, and select Edit.
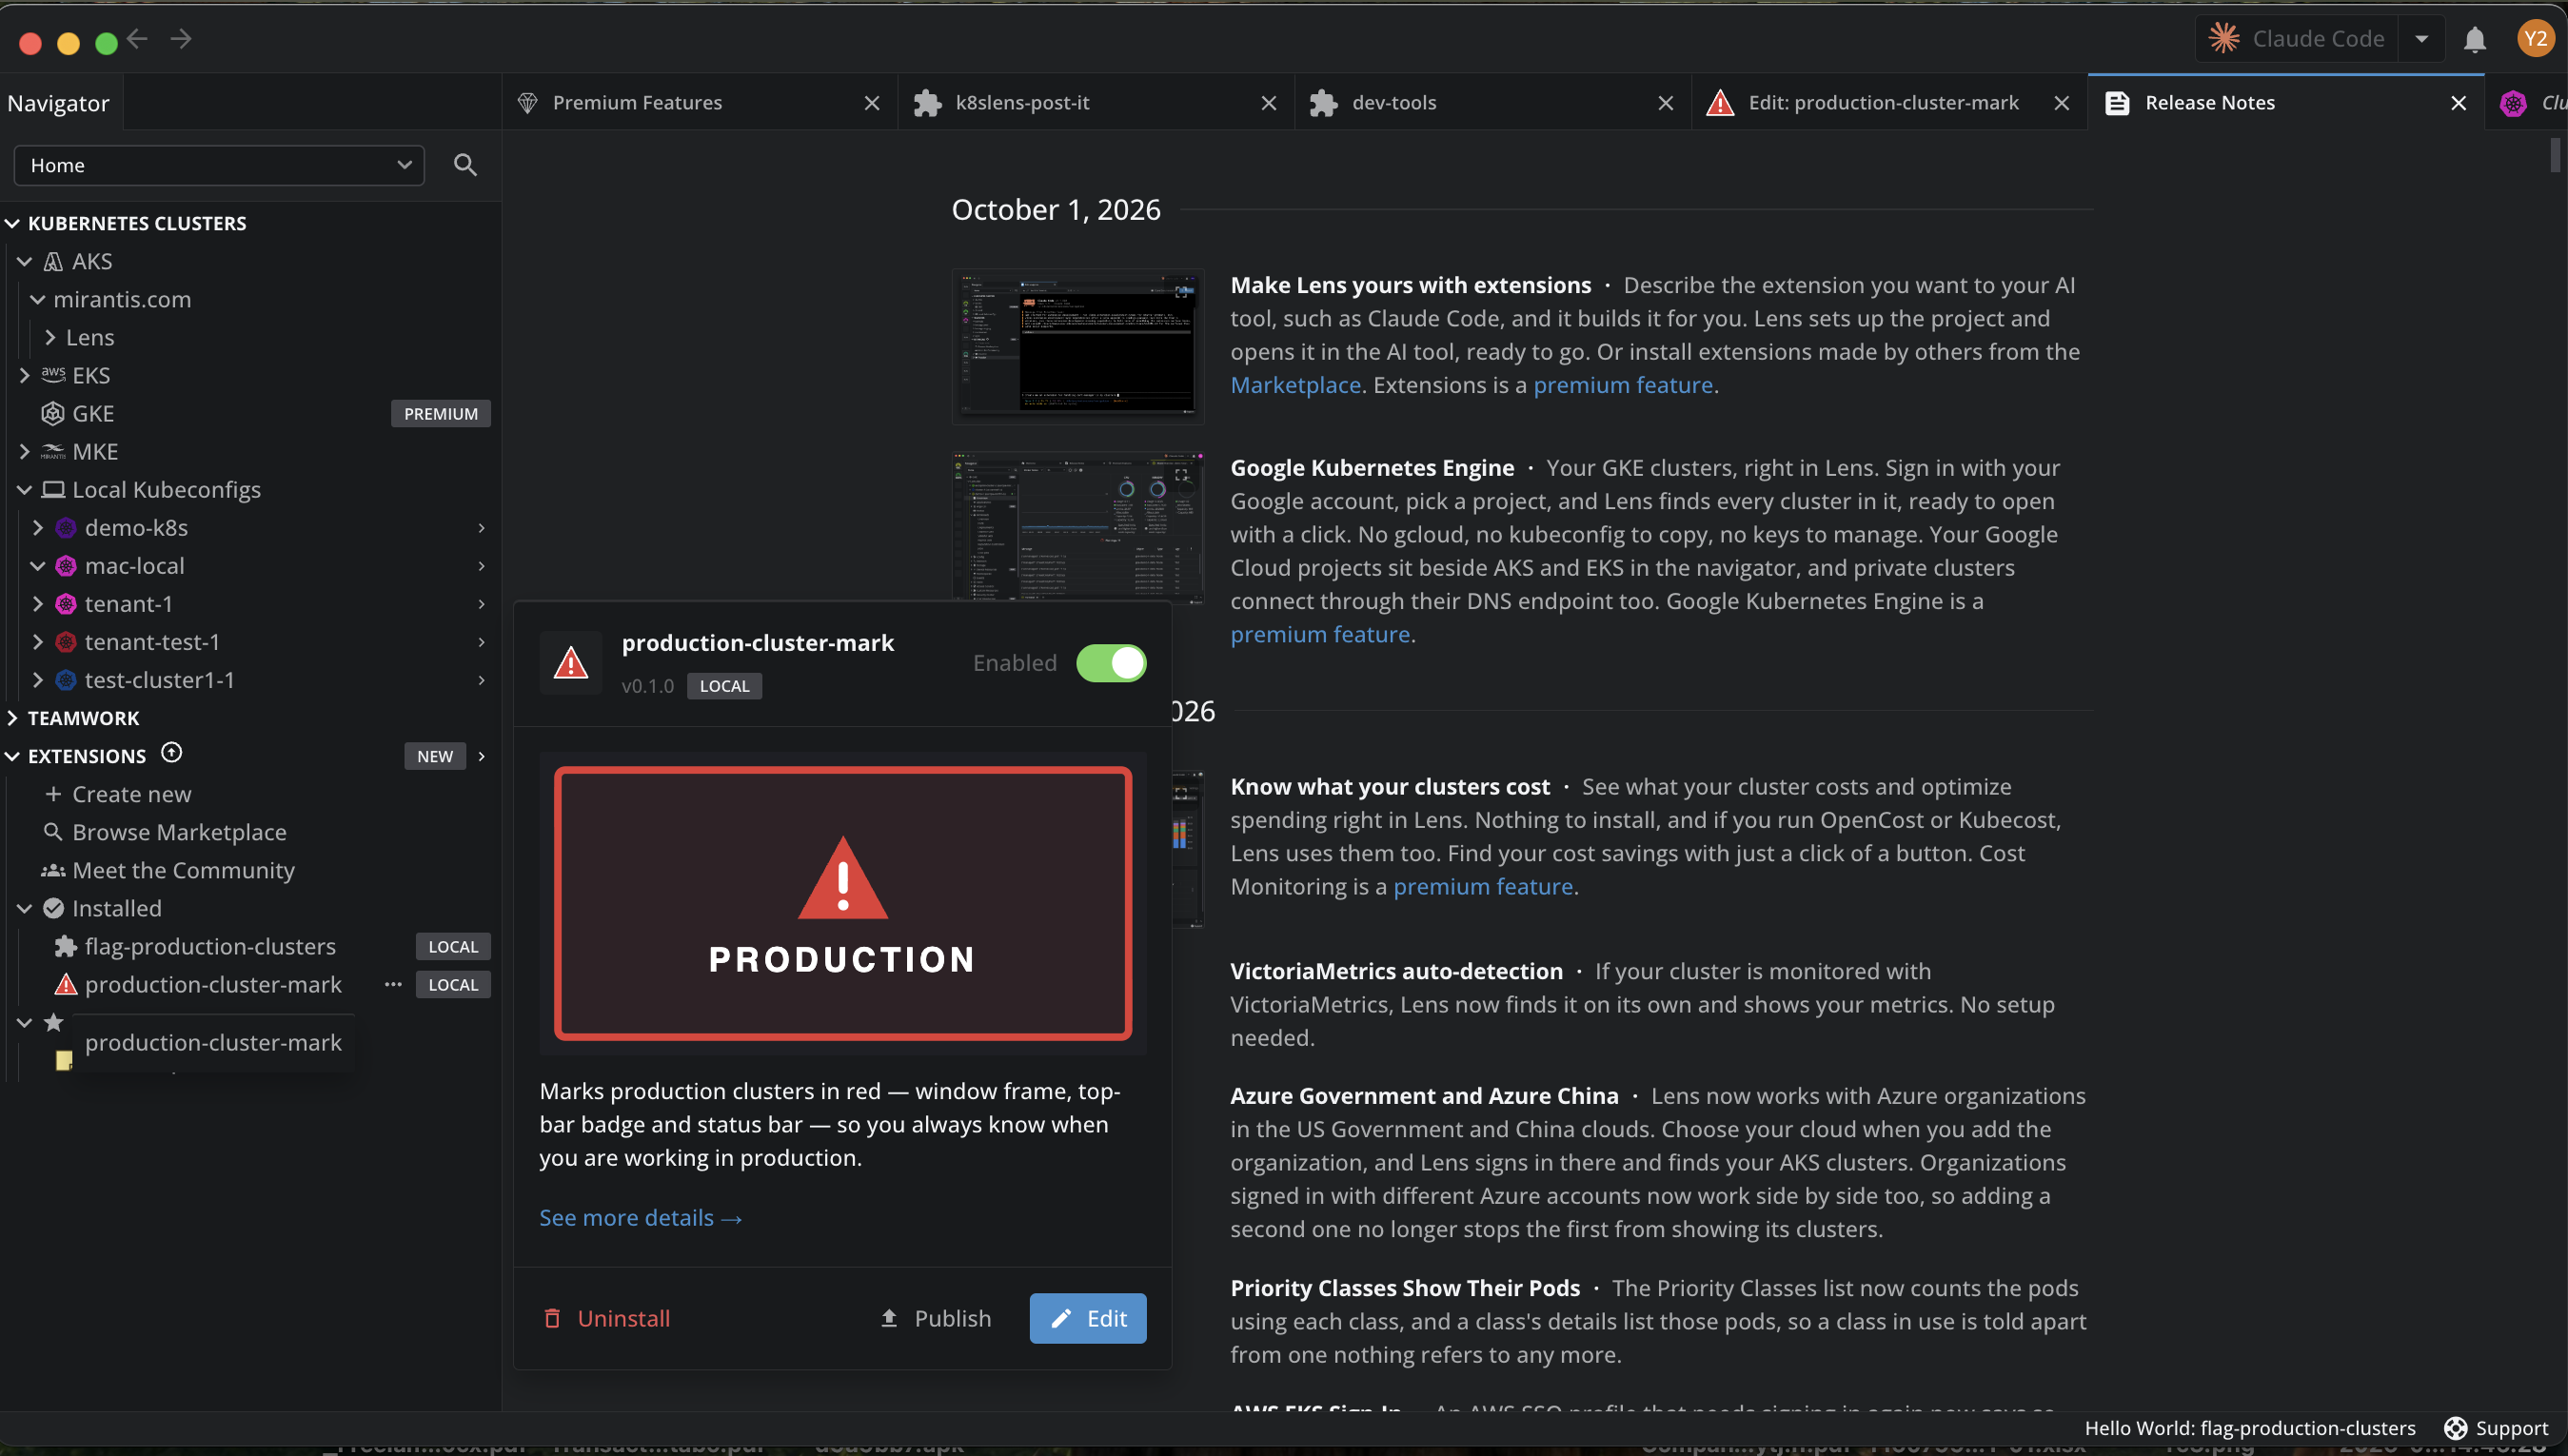
Lens opens a tab named Edit: followed by the extension name, with your AI tool in the extension folder. Describe the next change and iterate as in Step 4.
Clone a published extension#
To start from a published extension instead of a blank project, clone it: Lens copies its Git repository into a local extension of your own, builds it, and opens it for development like a created extension. See Clone an extension.